Blog

Desserts

Hey there! Happy 4th, for those of you living in the United States! Can you believe it’s already July?! Today I dug up a few graphic design pieces I created a while ago, which are based on a few popular desserts: cupcakes, soft-serve ice cream, and macaroons. Cupcakes and ice cream are definitely among my personal favorites. Although I am not a big fan of macaroons, they are very fun to draw!

Using the powerful Adobe Draw, I was able to create simplistic designs with layers and a variety of cool brushes. Mmm, writing this post is making me crave an ice cream cone right now!

DIY Recycled Water Bottle Cases

Hello everyone! I’ve been swamped these past few months, and am excited to be updating the blog again! A couple of weeks ago, I came across a project on Make It & Love It through Pinterest, and decided to create a variation of the zipper case. I absolutely love these DIY recycled water bottle cases because they are sustainable and useful for organization, not to mention adorable!

Materials

  • Plastic water bottle of your choice (If you happen to drink Evian water, I found that the Evian 500 mL bottles work wonderfully. The labels come off easily without leaving residue on the bottle, the plastic is sturdy, and the bottle opening is large enough to fit a quarter if you were to use the final product as a piggy bank!)
  • Zipper as long as the circumference of your bottle (For the Evian bottles, an 8″ long zipper was perfect.)
  • 1/4″ wide double-sided tape (After experimenting with various brands of double-sided tape, I found that Scor-Tape by Scor-Pal works particularly well.)
  • Scissors
  • Craft knife
  • Pen or fine point marker

IMG_4473

Steps

Start off by drawing a line around the bottle with a pen or fine point marker at the height at which your zipper will be. Cut along the line with a craft knife (or scissors) to separate the bottle into a bottom part and a top part. (Using a craft knife to cut through the plastic tends to leave a smoother edge than using scissors.) Be careful of the cut edges; they are very sharp. If you need to dry off the inside of the bottle, you can use chopsticks to hold the tissue.

Peel the labels off the bottle. I love that the labels of the Evian bottles don’t leave residue! Wrap the double-sided tape around both cut edges of the top and bottom parts of the bottle. Cut off the extra zipper fabric extending beyond the bottom stop.

Peel off the backing of the double-sided tape and wrap one side of the zipper around the cut edge of the bottle, starting from the bottom stop of the zipper. Then, unzip the zipper.

Wrap the other side of the zipper around the cut edge of the remaining part of the bottle, starting from the bottom stop of the zipper.

Use double-sided tape to secure the extra fabric extending beyond the top zipper stop to overlap the end of the zipper with the bottom stop.

Store your chosen supplies in your newly-crafted recycled zipper case! These versatile containers can store anything from colored pencils to coins. I had a wonderful time making these and hope you do, too!

IMG_4498

Feel free to mix it up and use two bottom parts (or two top parts). Have a lovely day!

Hello 2018

Happy new year to all! Can you believe it’s already 2018?! Now is the time to look back on our accomplishments in 2017 and plan for the year ahead. Well, for the new year I’ve decided to share a fun graphic design piece with you all. I haven’t done much graphic design recently, so it felt good to start doodling again! I also have a few new year’s resolutions that I hope I’ll be able to carry out this year:

  1. Don’t procrastinate
  2. Think outside the box
  3. Post more often
  4. Believe in your abilities

What are your new year’s resolutions? Thanks for stopping by!

One Year

December 21 was my blogiversary. I simply cannot believe that it’s been an entire year. It feels like yesterday that I was introducing myself to the blogging community, a little nervous and extremely excited. And yet, I’ve improved so much as an artist and writer over the past year because of you guys, and have been inspired by every single post I’ve read. Today I thought to myself, “Bet you never dreamed in a million years you’d start a blog, did you? And have the opportunity to design for others? And gain over 200 readers? And so many amazing friends with the most creative ideas?! Please just do one thing for me: don’t stop blogging.” And so, my blogging journey continues with Turtledesk. A huge thank you to all of you who have inspired me and continue to do so. Also, a huge thank you to WordPress for getting me started!

You are all incredible. Keep up the amazing work. Keep blogging. Keep those creative juices flowing. Happy holidays!

P.S. Another monarch butterfly showed up in my backyard a few days ago. It was drawn to the marigolds. I hope it stays for the holidays!

Hello again! Plus the Museum of Ice Cream

Hey everyone! I’ve been super busy the past couple of months and am so happy to be writing again! Truthfully, I’ve been wanting to blog for a really long time, but I never got the chance to do so. Finally I decided today that I would make an earnest effort to write a blog post and get back in touch with all of you. Thanks for being so supportive while I was gone and hopefully I can make time to blog more often! There’s been one major change to the site since the last time I’ve posted—I’ve changed my public display name to Joy. But feel free to call me whatever feels most comfortable! Recently I had the opportunity to visit the LA Museum of Ice Cream and it was absolutely spectacular. I have to say my favorite part was the Sprinkle Pool, although everything on display was incredible. The rooms are beautiful and give off such a great vibe. There are so many photo opportunities and the staff is amazing as well! The best part? There are sweets in almost every room. And since the Museum of Ice Cream is an art museum, I thought I’d document my visit with some photos!

The museum is located in a bright pink warehouse decorated with some awesome wall art. Pink and white ice cream cones on the ground trace a path from the parking lot to the museum.

In the California Room, pastel pink palm trees accompany a Venice Cream sign and Museum of Ice Cream wall art. Pink stars on the ground mimick the Hollywood Walk of fame, bearing the names of honorees like Scoop Dogg and Brad Pittstachio. We were offered delicious piñata ice cream, my favorite treat of all!

The Banana Split Room! I thought this was so creative—literally splitting the bananas down the middle by making half of them yellow and the other half pink. A beautiful installation, too!

I loved the color scheme of the Mint Room. Instead of the usual pink, the walls are a soft mint blue. We got to try mint chocolate chip mochi and sniff the chocolate-smelling soil in which the mint plants are growing!

img_3055-e1508610878819.jpg

The sherbert room was awesome as well—rainbows and mirrors line the walls, and we all got to try the claw machine containing prizes ranging from cotton candy to ice cream phone cases. It was also a really great spot for a selfie!

The Popsicle Room was just how I had imagined it. The colors of the popsicles are bright and loud in contrast to the white walls, and all of the popsicle sticks are engraved! There were no treats in this room, but admiring the popsicles was more than amazing.

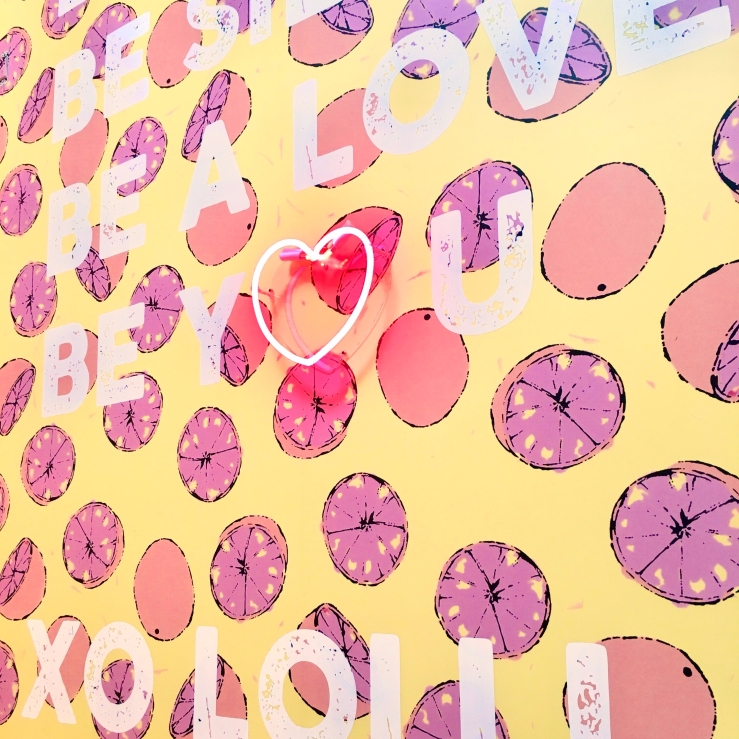
In my opinion, the Gummy Bear Room was the most colorful room of all. Several giant gummy bear sculptures sat on blocks around the room, and whimsical shapes and neon lights decorated the walls. And, we were offered a handful of—wait for it—gummy bears!

img_3071-1.jpg

My favorite art installation of all was the black ice cream cone installation. Unlike all of the other rooms, this room is entirely black and white save for the cones, which are a silvery brown. I loved it because it gives off a totally different vibe than the rest of the rooms.

IMG_3074

And of course, there is the Sprinkle Pool—the best part of all!

Thanks for stopping by and have an amazing day!

Acrylics

Hey there! I know I haven’t posted much lately, so I thought I’d share some of my acrylics with you! Usually I prefer digital art or sketching, but every so often I enjoy trying out a different medium. I painted a bird a couple of years ago, but the hot air balloons and the Latte paintings are more recent. It was a little difficult to mix the colors, but the great thing about painting in general is that it is very forgiving. As Bob Ross says, there are no mistakes in art—just happy little accidents!

DSC_4139

The hardest part about this one was painting the clouds. I did enjoy painting the water and the hot air balloons, though.

DSC_4141

For this one, I spent quite a long time trying to perfect the folds in the fabric. Of course, my favorite part was painting the Latte plush!

DSC_4142

This painting is based on a photo of a black-crowned night heron I observed in Hawaii.

What is your favorite medium of art? Do you enjoy painting with acrylics? Have an amazing day!

Autumn

Autumn is a second spring when every leaf is a flower.

Albert Camus

The sun is bright

but not blinding,

coating the world

in a hazy afternoon light.

The orange and yellow leaves

drift gently to the ground,

and you are lost,

lost in the beauty

of the world around you.

You pause to think, only about

how lucky you must be

to live in this incredibly

wonderful world.

Happy autumn everyone!

Photo credit: pixel2013 on Pixabay.

Niagara Falls Photography

Hello lovely people! I can’t begin to tell you how excited I am right now. First of all, thank you so much for 200 followers! You guys are the best! Thanks for all of your encouragement and support as well; it really motivates me to write more. This week I have finally gotten around to going through my photos from Niagara Falls—and have chosen a few of them to share with you today! Of course, none of these photos come close to capturing the full beauty of the Falls. They are absolutely breathtaking, and if you haven’t been, I strongly encourage it!

In the morning, we hiked across Rainbow Bridge to the American side of the Falls. From the bridge, we could see a lovely view of both the Horseshoe Falls and the American Falls.

We visited each of the three lookouts on the American side, and stumbled upon a beautiful rainbow when we visited the lookout between the American Falls and the Bridal Veil Falls. It was gorgeous!

Later, we took a Hornblower boat tour on the Canadian side of the Falls and got incredibly misted. The tour provided an excellent close-up view of Horseshoe Falls.

There was, of course, the occasional brave seagull (make that fifty). They all seemed to be quite unperturbed by the loud, rushing water.

After a long day of walking, however, it was quite obvious that the best view of all was from the balcony of our own hotel room. The Falls were not only spectacular during the day, but overnight as well—as they were illuminated in the dark.

Thanks so much for stopping by! Have you ever been to the Falls? Let me know in the comments!

P.S. I had so much fun watching the eclipse unfold through my pinhole projector! The picture on the right was taken with my camera through a solar filter.

DIY Solar Eclipse Pinhole Projector

Hi everyone! As you probably already know, a solar eclipse will be visible in North America tomorrow! To prepare for this exciting event, I’ve created a pinhole projector from a repurposed cardboard box. Obviously, it’s very important not to look directly at the sun with the naked eye—and since authentic solar viewers are difficult to obtain at this time, viewing the eclipse indirectly with a pinhole projector is an easy and safe alternative. I had so much fun with this DIY and hope you do, too!

Materials

  • Cardboard box (mine was about 8″ tall with flaps up, 13.5″ wide and 9.75″ deep)
  • Cardstock paper (preferably a dark color, to avoid glare)
  • Push pin
  • Tape
  • Binder clips

Steps

Create the viewing window by cutting off one of the longer sides of the box together with the flap. Tape the remaining 3 flaps up to create the walls of the projector.

Cut a large rectangle out of the flap of the now loose side of the box to create a frame with a 1-2″ border on three sides. Tape the frame to the top of the box so that it opens in the direction of the viewing window.

Cut the remaining rectangular cutout in half and fold each piece in half. Tape these pieces to each side of the box so that they complete the rest of the frame. (The frame will be used to support the sheet of cardstock paper with the pinhole pattern.)

Make pinholes in a sheet of cardstock paper with a push pin (you can widen them with a toothpick if needed). To make the letters as accurately as possible, I printed out a template on a sheet of 8.5″ by 11″ printing paper using the Codystar font as a guide.

Lay the sheet of cardstock paper with the pinhole pattern over the frame at the top of the projector and secure the bottom corners to the frame with binder clips. Slip a dark-colored sheet of paper onto the bottom of the projector to serve as a screen. Angle the pinhole pattern toward the sun so that the sunlight streams through the pinholes onto the screen below. Enjoy!

I know some of the directions might be a bit vague, but hopefully the photos help. Let me know how it goes!

P.S. Each spot of light should show an image of the sun. The above photos were taken of the uneclipsed sun; therefore, each spot of light is a circle. During the eclipse, the projector should display a pattern of crescent-shaped dots while the sun is partially blocked.

Dream Bigger

Hey there! Sorry about the absence of posts recently—I’ve been extremely busy this past week getting ready for an exciting trip to the east coast with my family (surprise, surprise!)! I’ve missed you all! As of now, we’ve just gotten settled in our hotel rooms by Niagara Falls. Don’t worry, I’ll keep you posted with photos and all—but since it’s pretty dark out right now, I thought I’d share a poem in the meantime. Enjoy!

Dream bigger, dream bigger,

reach higher, reach higher.

Believe in your ambitions,

have faith in what you seek.

Dream bigger, dream bigger,

reach higher, reach higher.

Look far and deep into your soul,

fly until you reach your goal.

Thanks for stopping by and have a lovely day!